

Clear your concepts with CKA Questions Before Attempting Real exam
Get professional help from our CKA Dumps PDF
NEW QUESTION # 47
Create a snapshot of the etcd instance running at https://127.0.0.1:2379, saving the snapshot to the file path /srv/data/etcd-snapshot.db.
The following TLS certificates/key are supplied for connecting to the server with etcdctl:
CA certificate: /opt/KUCM00302/ca.crt
Client certificate: /opt/KUCM00302/etcd-client.crt
Client key: Topt/KUCM00302/etcd-client.key
Answer:
Explanation:
solution
NEW QUESTION # 48
You are running a service that handles requests from multiple pods. How can you scale the service to handle increased traffic without impacting the service availability during the scaling process?
Answer:
Explanation:
See the solution below with Step by Step Explanation.
Explanation:
Solution (Step by Step) :
1. Use a Deployment:
- Deploy the service using a Deployment with the desired number of replicas.
2. Define a Service:
- Create a Service that exposes the application to the outside world.
- Use a 'type: LoadBalancer' to distribute traffic across the pods.
3. Implement Horizontal Pod Autoscaler (HPA):
- Create an HPA that monitors the service's CPU usage.
- Configure the HPA to scale the Deployment based on the CPU utilization.
4. Test the Autoscaling: - Simulate increased traffic to the service. - Observe the HPA scaling the Deployment to meet the demand. 5. Monitor the Service: - Monitor the service's performance and ensure that it remains available and stable during scaling. 6. Adjust HPA Configuration: - Fine-tune the HPA configuration to optimize scaling based on specific performance needs.
NEW QUESTION # 49
List the nginx pod with custom columns POD_NAME and POD_STATUS
Answer:
Explanation:
kubectl get po -o=custom-columns="POD_NAME:.metadata.name,
POD_STATUS:.status.containerStatuses[].state"
NEW QUESTION # 50
You have a deployment named 'my-app' running a web application that uses an external database service. You need to configure a 'ClusterlP' service to route traffic to the external database service.
Answer:
Explanation:
See the solution below with Step by Step Explanation.
Explanation:
Solution (Step by Step) :
1 . Create the ClusterlP service:
- Create a 'ClusterlP' service that points to the external database service using the 'externalName' field.
2. Apply the service: - Apply the YAML file using 'kubectl apply -f external-db-service.yamr 3. Verify the service: - Check the status of the service using 'kubectl get services external-db-service -n ' 4. Test the service: - From a pod in the same namespace as the service, try to connect to the external database service using the 'external-db-service' service name and port. Note: - Replace with the actual namespace. - Replace 'my-external-db.example.com' with the actual hostname of your external database service. - Ensure that your cluster has access to the external database service.
NEW QUESTION # 51
Monitor the logs of pod foo and:
* Extract log lines corresponding unable-to-access-website
* Write them to/opt/KULM00201/foo
Answer:
Explanation:
See the solution below.
Explanation
solution

NEW QUESTION # 52
Score:7%
Task
Create a new PersistentVolumeClaim
* Name: pv-volume
* Class: csi-hostpath-sc
* Capacity: 10Mi
Create a new Pod which mounts the PersistentVolumeClaim as a volume:
* Name: web-server
* Image: nginx
* Mount path: /usr/share/nginx/html
Configure the new Pod to have ReadWriteOnce
Finally, using kubectl edit or kubectl patch PersistentVolumeClaim to a capacity of 70Mi and record that change.
Answer:
Explanation:
See the solution below.
Explanation
Solution:
vi pvc.yaml
storageclass pvc
apiVersion: v1
kind: PersistentVolumeClaim
metadata:
name: pv-volume
spec:
accessModes:
- ReadWriteOnce
volumeMode: Filesystem
resources:
requests:
storage: 10Mi
storageClassName: csi-hostpath-sc
# vi pod-pvc.yaml
apiVersion: v1
kind: Pod
metadata:
name: web-server
spec:
containers:
- name: web-server
image: nginx
volumeMounts:
- mountPath: "/usr/share/nginx/html"
name: my-volume
volumes:
- name: my-volume
persistentVolumeClaim:
claimName: pv-volume
# craete
kubectl create -f pod-pvc.yaml
#edit
kubectl edit pvc pv-volume --record
NEW QUESTION # 53
Schedule a Pod as follows:
. Name: kucc1
. App Containers : 2
. Container Name/Images :
* redis
* Memcached
Answer:
Explanation:
A screen shot of a computer AI-generated content may be incorrect.
NEW QUESTION # 54
You have a Deployment running on a Kubernetes cluster with limited resources. How can you adjust the Deployment to use resources more efficiently and prevent resource contention?
Answer:
Explanation:
See the solution below with Step by Step Explanation.
Explanation:
Solution (Step by Step) :
1. Define Resource Requests and Limits:
- Set 'requests' and 'limits' for CPU and memory for the containers in the Deployment.
- This helps in specifying the minimum resources required by the pods and the maximum resources that they can consume.
2. Optimize Container Images: - Use smaller and more efficient container images to reduce the resource footprint of the pods. 3. Use Resource Quotas: - Apply resource quotas at the namespace level to control the resource consumption of the pods within a namespace. 4. Consider Pod Disruption Budgets (PDB): - Implement PDBs to control the maximum number of pods that can be unavailable during a rolling update or pod deletion. - This ensures that the application remains available during resource-intensive events. 5. Utilize Node Affinity and Tolerations: - Configure node affinity and tolerations to schedule pods on specific nodes that have the required resources. 6. Monitor Resource Utilization: - Regularly monitor the resource utilization of the cluster and the pods. - Use tools like 'kubectl top pods', 'kubectl top nodes', and 'kubectl describe nodes' to gather resource utilization data. - Adjust resource requests and limits accordingly based on the monitoring data.
NEW QUESTION # 55
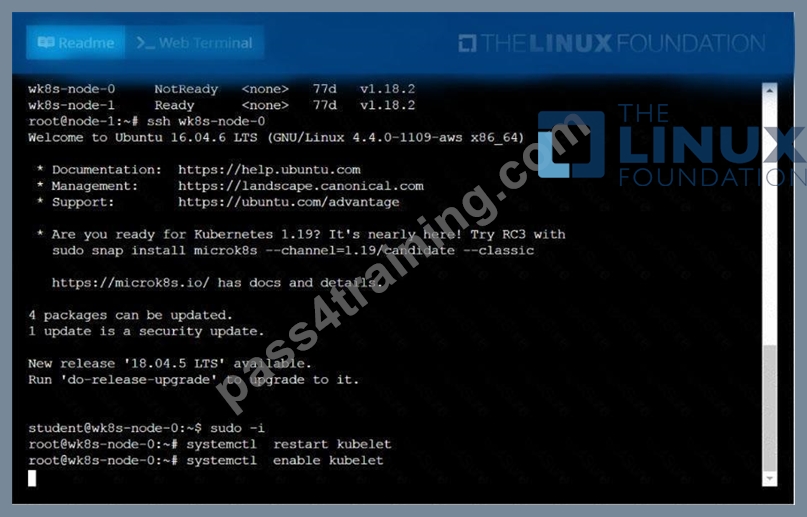
A Kubernetes worker node, named .Investigate why this is the case,
andperform any appropriate steps tobring the node to a state,ensuring that any changes are madepermanent.
You cansshto the failednode using:
[student@node-1] $ | sshWk8s-node-0
You can assume elevatedprivileges on the node with thefollowing command:
[student@w8ks-node-0] $ |sudo -i
Answer:
Explanation:
See the solution below.
Explanation
solution

NEW QUESTION # 56
You have a Deployment named 'nginx-deployment running an Nginx server. The Nginx configuration file is stored in a ConfigMap named 'nginx-config'. You need to dynamically update the Nginx configuration file without restarting the Nginx pods.
Answer:
Explanation:
See the solution below with Step by Step Explanation.
Explanation:
Solution (Step by Step) :
1 . Create the ConfigMap (if not already existing):
- Define a ConfigMap named 'nginx-config' containing the Nginx configuration file. For example, create a file 'nginx.conf with the desired configuration and then create the ConfigMap using 'kubectl create configmap nginx-config --from-file=nginx.conf:
kubectl create configmap nginx-config --from-file=nginx.conf
2. Configure Nginx Deployment:
- Modify the 'nginx-deployment' Deployment to mount the 'nginx-config' ConfigMap as a volume.
- Use 'volumeMounts' to specify where the ConfigMap should be mounted (e.g., '/etc/nginx/conf.d/' ) and 'volumes' to define the ConfigMap as a volume source.
- Update the Nginx container's configuration to use the mounted configuration file (e.g., 'nginx -g daemon off;').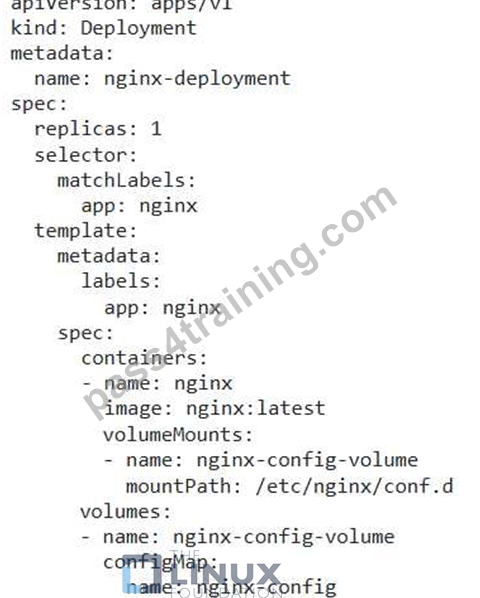
3. Update the ConfigMap: - Modify the 'nginx-config' ConfigMap with the new configuration content. This can be done using 'kubectl patch' or 'kubectl edit': kubectl patch configmap nginx-config -p '{"data": {"nginx.conf": "new_nginx_configuration"}}' 4. Observe Nginx Pods: - Monitor the Nginx pods in the 'nginx-deployment' Deployment. Since the ConfigMap is mounted as a volume, Nginx will automatically reload the configuration file without restarting the pod. 5. Verify the Update: - Use 'kubectl logs' or 'kubectl exec' to examine the Nginx pod's logs and confirm that the new configuration is being used.
NEW QUESTION # 57
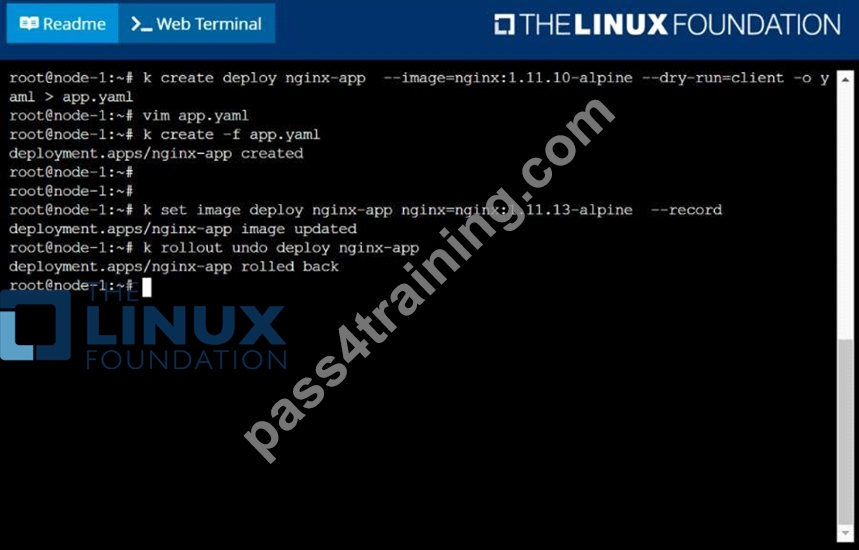
Create a deployment as follows:
Name: nginx-app
Using container nginx with version 1.11.10-alpine
The deployment should contain 3 replicas
Next, deploy the application with new version 1.11.13-alpine, by performing a rolling update.
Finally, rollback that update to the previous version 1.11.10-alpine.
Answer:
Explanation:
solution

NEW QUESTION # 58
You have a Deployment that runs a containerized web application. The web application depends on a specific database service running on a different node in the cluster. The web application should only be able to connect to the database service on port 5432 and not any other services running on the database node. How can you define a NetworkPolicy to achieve this?
Answer:
Explanation:
See the solution below with Step by Step Explanation.
Explanation:
Solution (Step by Step) :
1. Network Policy Definition:
2. Explanation: - 'apiVersion: networking.k8s.io/v1 Specifies the API version for NetworkPolicy resources. - 'kind: NetworkPolicy': Specifies that this is a NetworkPolicy resource. - 'metadata.name: allow-database-access': Sets the name of the NetworkPolicy. - 'metadata.namespace: Specifies the namespace where the NetworkPolicy is applied. Replace with the actual namespace where your web application Deployment is running. - 'spec.podSelector.matchLabels: app: web-app': This selector targets Pods labeled with 'app: web-app', ensuring the NetworkPolicy applies to the web application Pods. - 'spec.ingress.from.podSelector.matchLabels: app: database': This allows incoming traffic only from Pods labeled with 'app: database'. - 'spec.ingress.ports.port: 5432': This allows communication only on port 5432. - 'spec.ingress.ports.protocol: TCP': Specifies the protocol (TCP) for the allowed port. 3. How it works: - This NetworkPolicy allows the web application Pods to connect only to the database service Pods on port 5432. It denies all other traffic from the database node, including other services that might be running on that node. 4. Implementation: - Apply the YAML using 'kubectl apply -f allow-database-access.yaml' 5. Verification: After applying the NetworkPolicy, test the connectivity from the web application Pods to the database service on port 5432 and to other services on the database node. You should observe that the NetworkPolicy effectively enforces the restrictions, allowing access only to the specified database port.
NEW QUESTION # 59
Create a deployment as follows:
Name: nginx-app
Using container nginx with version 1.11.10-alpine
The deployment should contain
Next, deploy the application with new version , by performing a rolling update.
Finally, rollback that update to the previous version
Answer:
Explanation:
See the solution below.
Explanation
solution
F:\Work\Data Entry Work\Data Entry\20200827\CKA\7 B.JPG
F:\Work\Data Entry Work\Data Entry\20200827\CKA\7 C.JPG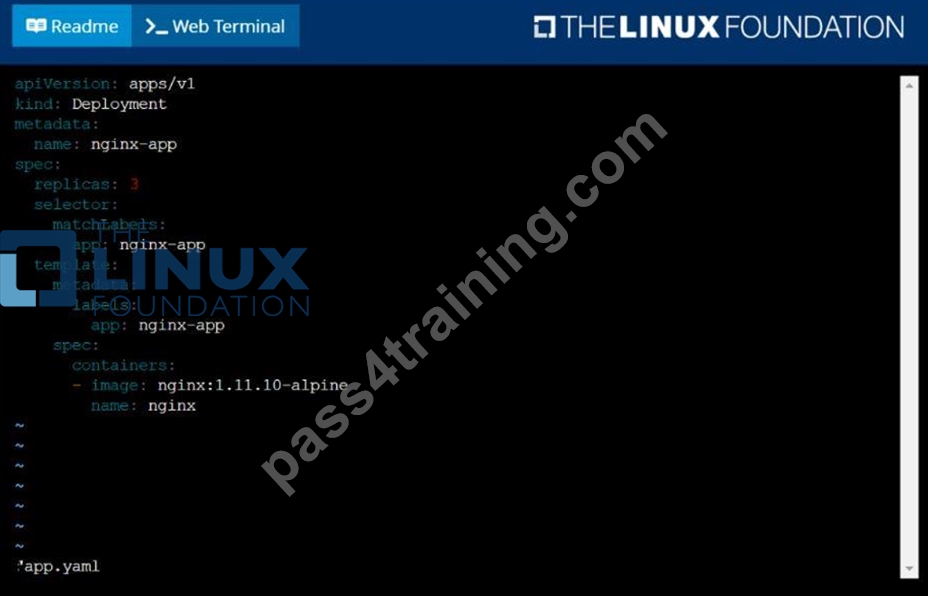
F:\Work\Data Entry Work\Data Entry\20200827\CKA\7 D.JPG
NEW QUESTION # 60
Undo the deployment with the previous version and verify
everything is Ok
Answer:
Explanation:
kubectl rollout undo deploy webapp kubectl rollout status deploy webapp kubectl get pods
NEW QUESTION # 61
You must connect to the correct host.
Failure to do so may result in a zero score.
[candidate@base] $ ssh Cka000058
Context
You manage a WordPress application. Some Pods
are not starting because resource requests are
too high.
Task
A WordPress application in the relative-fawn
namespace consists of:
. A WordPress Deployment with 3 replicas.
Adjust all Pod resource requests as follows:
. Divide node resources evenly across all 3 Pods.
. Give each Pod a fair share of CPU and memory.
Answer:
Explanation:
Task Summary
You are managing a WordPress Deployment in namespace relative-fawn.
* Deployment has 3 replicas.
* Pods are not starting due to high resource requests.
* Your job:# Adjust CPU and memory requests so that all 3 pods evenly split the node's capacity.
Step-by-Step Solution
1## SSH into the correct host
bash
CopyEdit
ssh cka000058
# Skipping this will result in a zero score.
2## Check node resource capacity
You need to know the node's CPU and memory resources.
bash
CopyEdit
kubectl describe node | grep -A5 "Capacity"
Example output:
yaml
CopyEdit
Capacity:
cpu: 3
memory: 3Gi
Let's assume the node has:
* 3 CPUs
* 3Gi memory
So for 3 pods, divide evenly:
* CPU request per pod: 1
* Memory request per pod: 1Gi
## In the actual exam, check real values and divide accordingly. If the node has 4 CPUs and 8Gi, you'd allocate ~1.33 CPUs and ~2.66Gi RAM per pod (rounded reasonably).
3## Edit the Deployment
Edit the WordPress deployment in the relative-fawn namespace:
kubectl edit deployment wordpress -n relative-fawn
Look for the resources section under spec.template.spec.containers like this:
resources:
requests:
cpu: "1"
memory: "1Gi"
If the section doesn't exist, add it manually.
Save and exit the editor (:wq if using vi).
4## Confirm changes
Wait a few seconds, then check:
kubectl get pods -n relative-fawn
Ensure all 3 pods are in Running state.
You can also describe a pod to confirm resource requests are set:
kubectl describe pod <pod-name> -n relative-fawn | grep -A5 "Containers" ssh cka000058 kubectl describe node | grep -A5 "Capacity" kubectl edit deployment wordpress -n relative-fawn
# Set CPU: 1, Memory: 1Gi (or according to node capacity)
kubectl get pods -n relative-fawn
NEW QUESTION # 62
Score: 4%
Task
Scale the deployment presentation
Answer:
Explanation:
See the solution below.
Explanation
Solution:
kubectl get deployment
kubectl scale deployment.apps/presentation --replicas=6
NEW QUESTION # 63
Create a persistent volume with name app-data, of capacity 2Gi and access mode ReadWriteMany. The type of volume is hostPath and its location is /srv/app-data.
Answer:
Explanation:
Persistent Volume
A persistent volume is a piece of storage in a Kubernetes cluster. PersistentVolumes are a cluster-level resource like nodes, which don't belong to any namespace. It is provisioned by the administrator and has a particular file size. This way, a developer deploying their app on Kubernetes need not know the underlying infrastructure. When the developer needs a certain amount of persistent storage for their application, the system administrator configures the cluster so that they consume the PersistentVolume provisioned in an easy way.
Creating Persistent Volume
kind: PersistentVolume
apiVersion: v1
metadata:
name:app-data
spec:
capacity: # defines the capacity of PV we are creating
storage: 2Gi #the amount of storage we are tying to claim
accessModes: # defines the rights of the volume we are creating
- ReadWriteMany
hostPath:
path: "/srv/app-data" # path to which we are creating the volume
Challenge
* Create a Persistent Volume named app-data, with access mode ReadWriteMany, storage classname shared, 2Gi of storage capacity and the host path /srv/app-data.
2. Save the file and create the persistent volume.
Image for post
3. View the persistent volume.
* Our persistent volume status is available meaning it is available and it has not been mounted yet. This status will change when we mount the persistentVolume to a persistentVolumeClaim.
PersistentVolumeClaim
In a real ecosystem, a system admin will create the PersistentVolume then a developer will create a PersistentVolumeClaim which will be referenced in a pod. A PersistentVolumeClaim is created by specifying the minimum size and the access mode they require from the persistentVolume.
Challenge
* Create a Persistent Volume Claim that requests the Persistent Volume we had created above. The claim should request 2Gi. Ensure that the Persistent Volume Claim has the same storageClassName as the persistentVolume you had previously created.
kind: PersistentVolume
apiVersion: v1
metadata:
name:app-data
spec:
accessModes:
- ReadWriteMany
resources:
requests:
storage: 2Gi
storageClassName: shared
2. Save and create the pvc
njerry191@cloudshell:~ (extreme-clone-2654111)$ kubect1 create -f app-data.yaml persistentvolumeclaim/app-data created
3. View the pvc
Image for post
4. Let's see what has changed in the pv we had initially created.
Image for post
Our status has now changed from available to bound.
5. Create a new pod named myapp with image nginx that will be used to Mount the Persistent Volume Claim with the path /var/app/config.
Mounting a Claim
apiVersion: v1
kind: Pod
metadata:
creationTimestamp: null
name: app-data
spec:
volumes:
- name:congigpvc
persistenVolumeClaim:
claimName: app-data
containers:
- image: nginx
name: app
volumeMounts:
- mountPath: "/srv/app-data "
name: configpvc
NEW QUESTION # 64
You are deploying an application on Kubernetes. You need to ensure that a minimum of three pods are always running for this application. How can you achieve this? Describe how to configure the deployment with a replica count and a liveness probe to monitor the health of the pods.
Answer:
Explanation:
See the solution below with Step by Step Explanation.
Explanation:
Solution (Step by Step) :
1. Create a Deployment with a Replica Count:
- Create a YAML file named 'deployment.yamr with the following content:
- Apply the YAML file using 'kubectl apply -f deployment.yaml&. 2. Configure a Liveness Probe: - Update the 'deployment.yaml' file to include a liveness probe. For example, you could use a HTTP probe: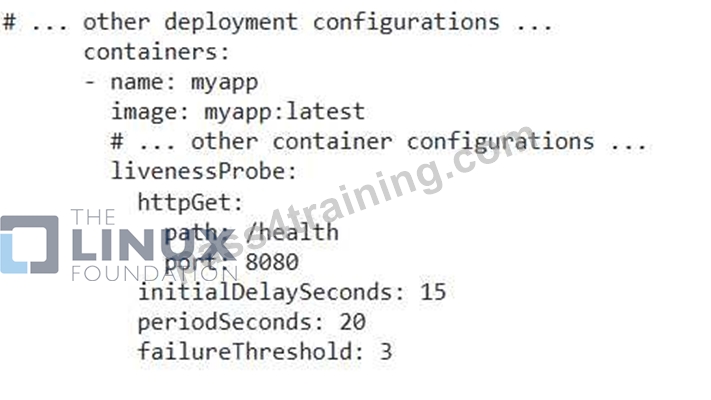
- Apply the updated YAML file using 'kubectl apply -f deployment.yaml'. 3. Verify the Deployment: - Check the status of the deployment using get deployments myapp-deploymen. - Ensure that three pods are running and that the liveness probe is monitoring their health. You can use 'kubectl describe pod myapp-deployment-XXXX' (where XXXX is the pod name) to see the details of the pod and the liveness probe status.
NEW QUESTION # 65
Perform the following tasks:
Add an init container to hungry-bear defined in spec file
/opt/KUCC00108/pod-spec-KUC
The init container should create /workdir/calm.txt
If /workdir/calm.txt is not
Once the spec file has been definition, the pod should be created
Answer:
Explanation:
See the solution below.
Explanation
solution
F:\Work\Data Entry Work\Data Entry\20200827\CKA\4 B.JPG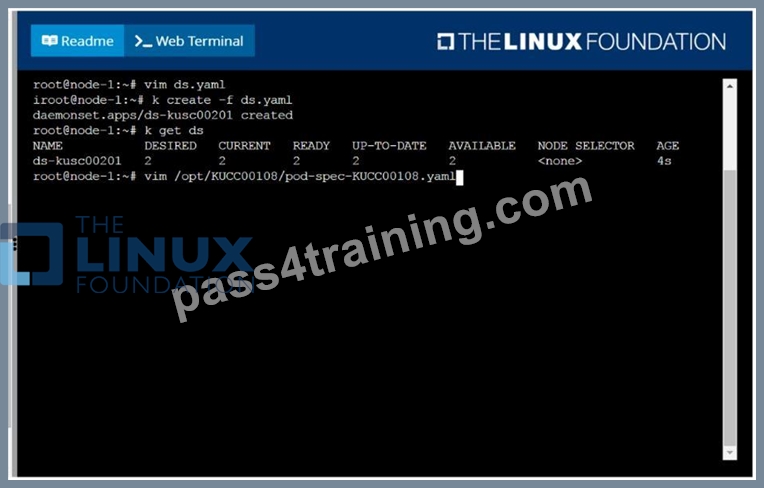
F:\Work\Data Entry Work\Data Entry\20200827\CKA\4 C.JPG
F:\Work\Data Entry Work\Data Entry\20200827\CKA\4 D.JPG
NEW QUESTION # 66
Create a persistent volume with name app-data, of capacity 2Gi and access mode ReadWriteMany. The type of volume is hostPath and its location is /srv/app-data.
Answer:
Explanation:
solution
Persistent Volume
A persistent volume is a piece of storage in a Kubernetes cluster. PersistentVolumes are a cluster-level resource like nodes, which don't belong to any namespace. It is provisioned by the administrator and has a particular file size. This way, a developer deploying their app on Kubernetes need not know the underlying infrastructure. When the developer needs a certain amount of persistent storage for their application, the system administrator configures the cluster so that they consume the PersistentVolume provisioned in an easy way.
Creating Persistent Volume
kind: PersistentVolume apiVersion: v1 metadata: name:app-data spec: capacity: # defines the capacity of PV we are creating storage: 2Gi #the amount of storage we are tying to claim accessModes: # defines the rights of the volume we are creating - ReadWriteMany hostPath: path: "/srv/app-data" # path to which we are creating the volume Challenge Create a Persistent Volume named app-data, with access mode ReadWriteMany, storage classname shared, 2Gi of storage capacity and the host path /srv/app-data.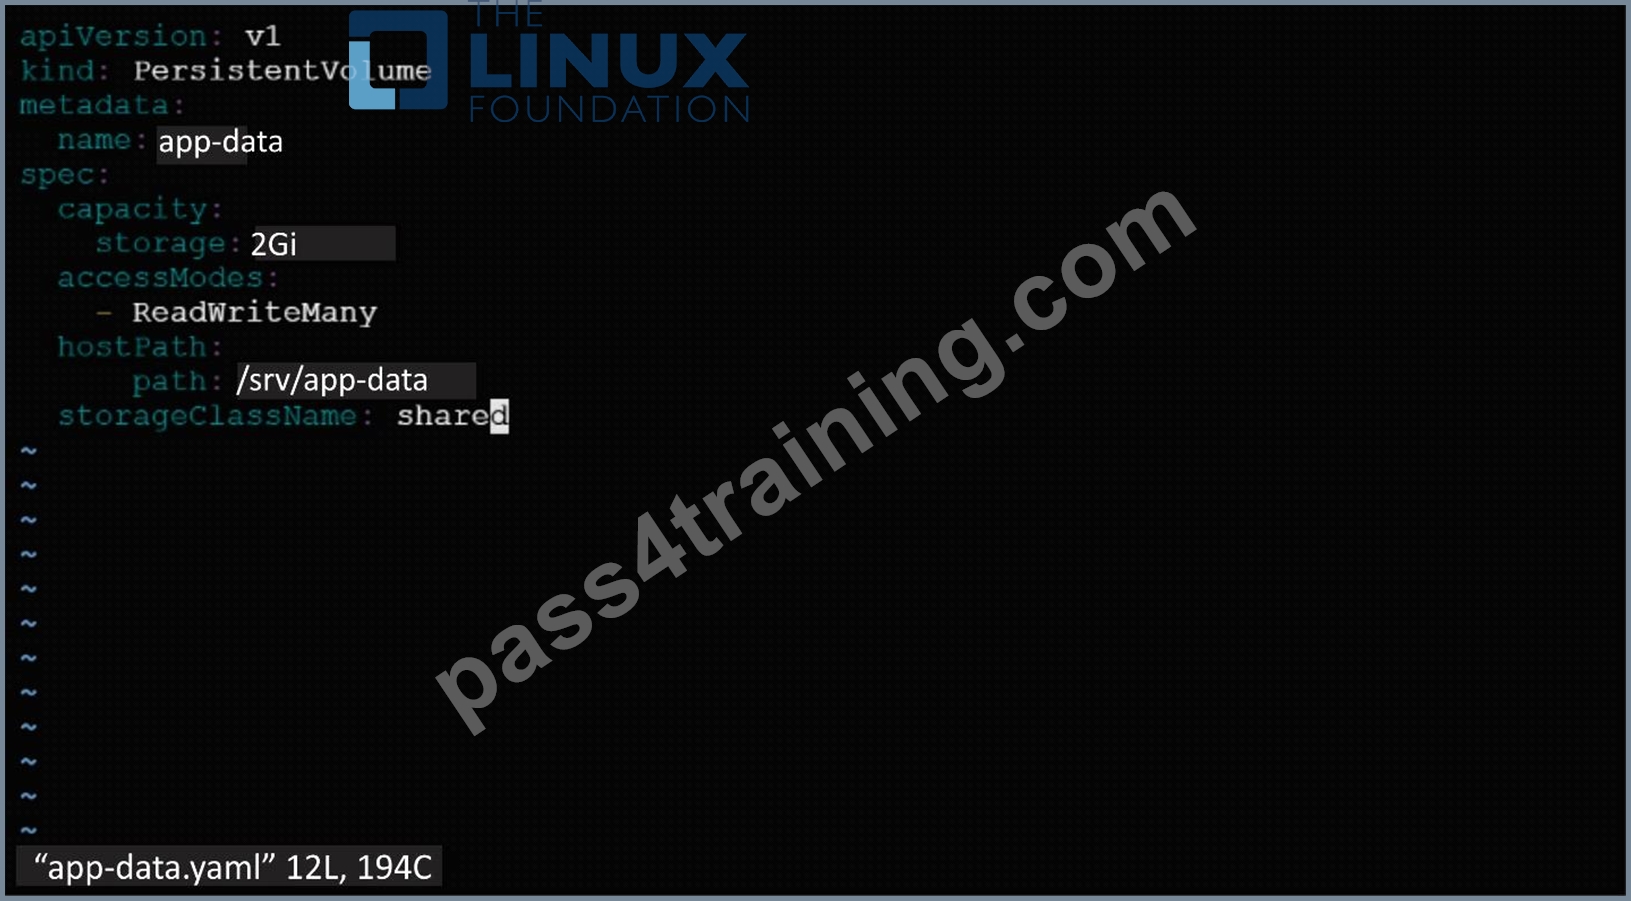
2. Save the file and create the persistent volume.
3. View the persistent volume.
Our persistent volume status is available meaning it is available and it has not been mounted yet. This status will change when we mount the persistentVolume to a persistentVolumeClaim.
PersistentVolumeClaim
In a real ecosystem, a system admin will create the PersistentVolume then a developer will create a PersistentVolumeClaim which will be referenced in a pod. A PersistentVolumeClaim is created by specifying the minimum size and the access mode they require from the persistentVolume.
Challenge
Create a Persistent Volume Claim that requests the Persistent Volume we had created above. The claim should request 2Gi. Ensure that the Persistent Volume Claim has the same storageClassName as the persistentVolume you had previously created.
kind: PersistentVolume apiVersion: v1 metadata: name:app-data
spec:
accessModes: - ReadWriteMany resources:
requests: storage: 2Gi
storageClassName: shared
2. Save and create the pvc
njerry191@cloudshell:~ (extreme-clone-2654111)$ kubect1 create -f app-data.yaml persistentvolumeclaim/app-data created
3. View the pvc
4. Let's see what has changed in the pv we had initially created.
Our status has now changed from available to bound.
5. Create a new pod named myapp with image nginx that will be used to Mount the Persistent Volume Claim with the path /var/app/config.
Mounting a Claim
apiVersion: v1 kind: Pod metadata: creationTimestamp: null name: app-data spec: volumes: - name:congigpvc persistenVolumeClaim: claimName: app-data containers: - image: nginx name: app volumeMounts: - mountPath: "/srv/app-data " name: configpvc
NEW QUESTION # 67
Configure the kubelet systemd- managed service, on the node labelled with name=wk8s-node-1, to launch a pod containing a single container of Image httpd named webtool automatically. Any spec files required should be placed in the /etc/kubernetes/manifests directory on the node.
You can ssh to the appropriate node using:
[student@node-1] $ ssh wk8s-node-1
You can assume elevated privileges on the node with the following command:
[student@wk8s-node-1] $ | sudo -i
Answer:
Explanation:
See the solution below.
Explanation
solution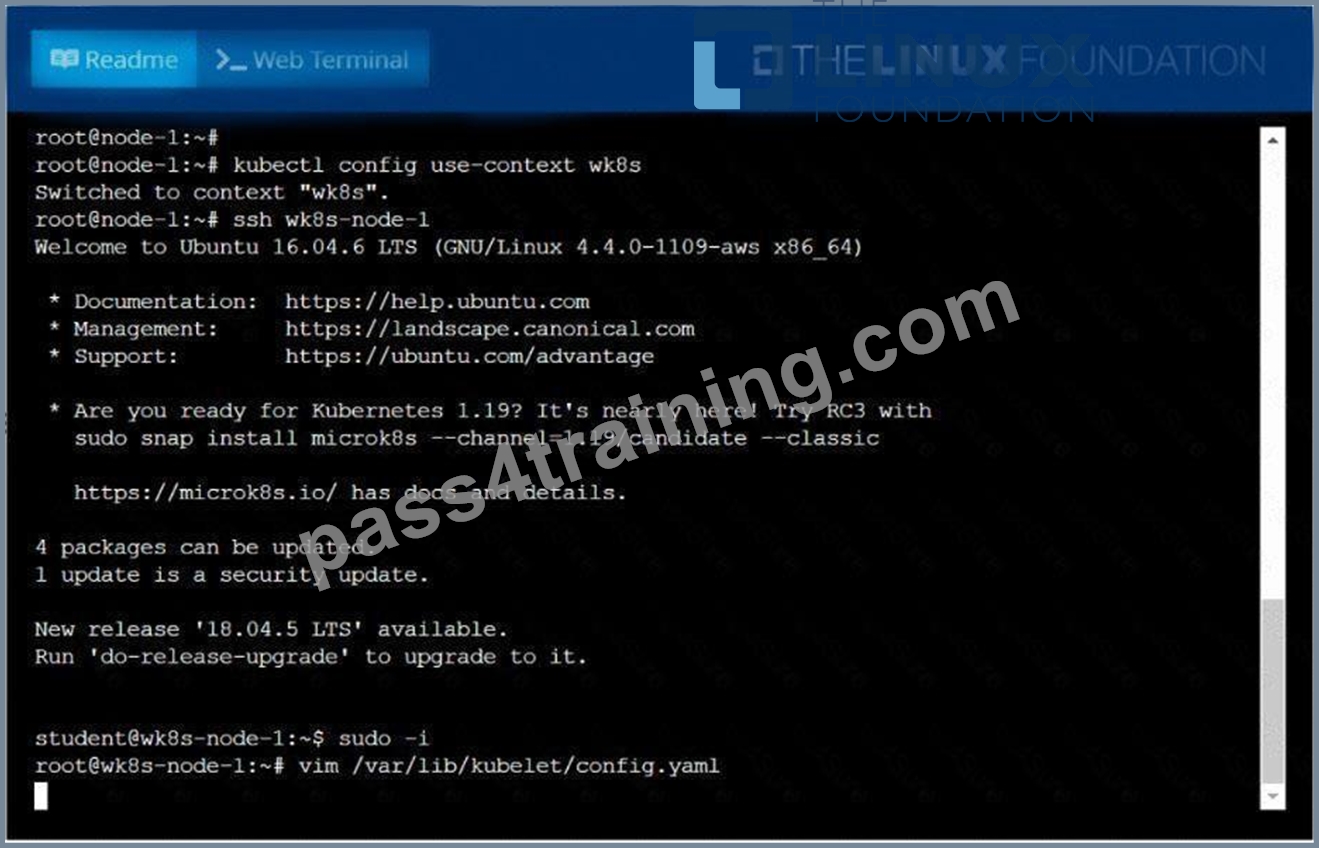

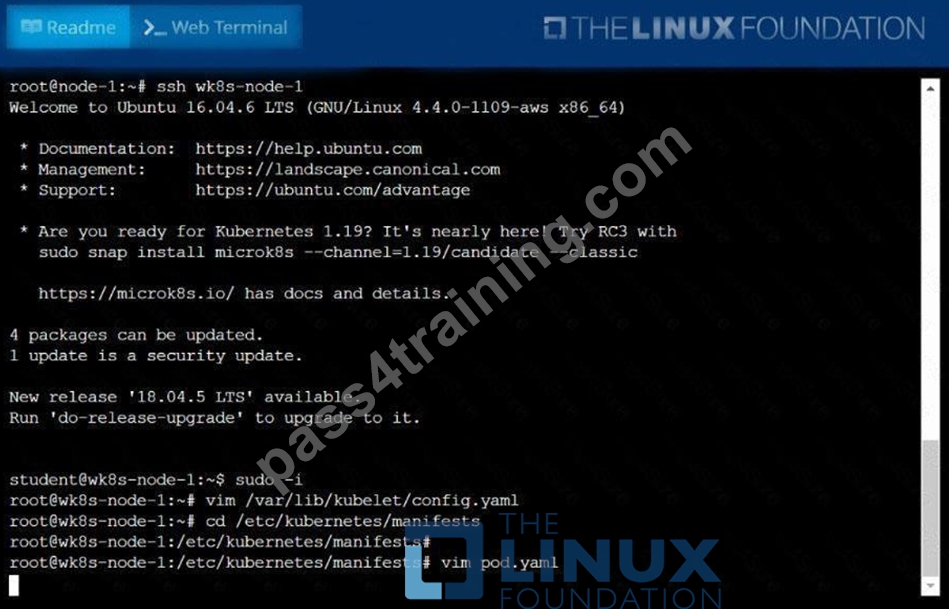
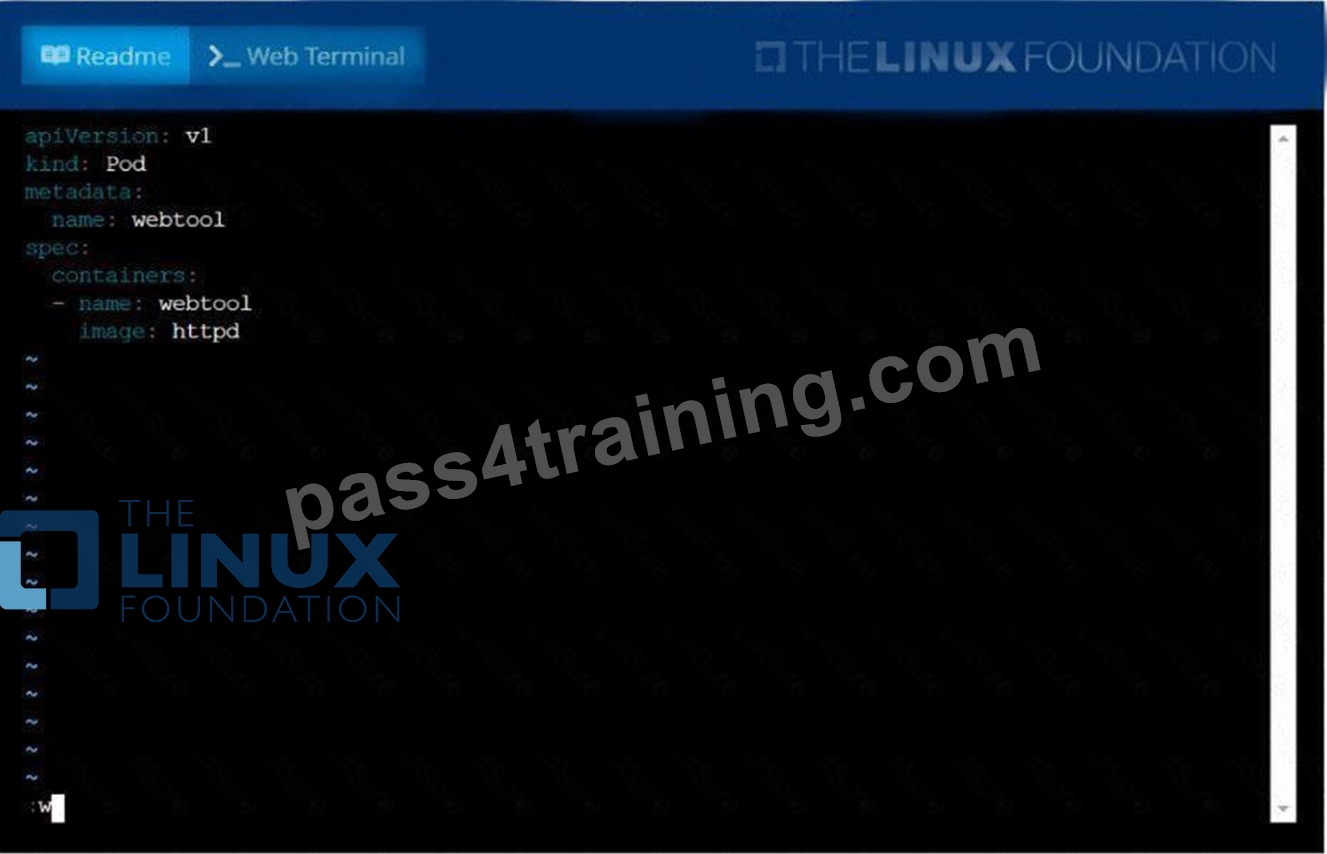

NEW QUESTION # 68
Create a Pod with main container busybox and which executes this
"while true; do echo 'Hi I am from Main container' >>
/var/log/index.html; sleep 5; done" and with sidecar container
with nginx image which exposes on port 80. Use emptyDir Volume
and mount this volume on path /var/log for busybox and on path
/usr/share/nginx/html for nginx container. Verify both containers
are running.
- A. // create an initial yaml file with this
kubectl run multi-cont-pod --image=busbox --restart=Never --
dry-run -o yaml > multi-container.yaml
// edit the yml as below and create it
kubectl create -f multi-container.yaml
vim multi-container.yaml
apiVersion: v1
kind: Pod
metadata:
labels:
run: multi-cont-pod
name: multi-cont-pod
spec:
volumes:
- name: var-logs
emptyDir: {}
containers:
- image: busybox
command: ["/bin/sh"]
args: ["-c", "while true; do echo 'Hi I am from Main
container' >> /var/log/index.html; sleep 5;done"]
name: main-container
volumeMounts:
- name: var-logs
mountPath: /var/log
- image: nginx
name: sidecar-container
ports:
- containerPort: 80
volumeMounts:
- name: var-logs
mountPath: /usr/share/nginx/html
restartPolicy: Never
// Create Pod
kubectl apply -f multi-container.yaml
//Verify
kubectl get pods - B. // create an initial yaml file with this
kubectl run multi-cont-pod --image=busbox --restart=Never --
dry-run -o yaml > multi-container.yaml
// edit the yml as below and create it
kubectl create -f multi-container.yaml
vim multi-container.yaml
apiVersion: v1
kind: Pod
metadata:
labels:
run: multi-cont-pod
name: multi-cont-pod
spec:
volumes:
- image: busybox
command: ["/bin/sh"]
args: ["-c", "while true; do echo 'Hi I am from Main
container' >> /var/log/index.html; sleep 5;done"]
name: main-container
volumeMounts:
- name: var-logs
mountPath: /var/log
- image: nginx
name: sidecar-container
ports:
mountPath: /usr/share/nginx/html
restartPolicy: Never
// Create Pod
kubectl apply -f multi-container.yaml
//Verify
kubectl get pods
Answer: A
NEW QUESTION # 69
Get the deployment rollout status
Answer:
Explanation:
kubectl rollout status deploy webapp
NEW QUESTION # 70
......
How can you enhance your CNCF CKA Certification Exam skills?
In order to become a Certified Kubernetes Administrator, you have to have the skills required to be able to jump in and help out in an emergency. You can always do more by taking CNCF CKA exam dumps. Dumps allow you to take the exam and pass it in the shortest amount of time possible. Lifecycle is the life of a container. The lifecycle in Kubernetes includes build, deploy, run, and delete. CNCF CKA Certification Exam is being delivered with the help of online tools. Administrators are responsible for managing, operating, and running containers. Mock exams will help IT professionals get ready for the CNCF CKA Certification Exam. All the necessary resources will be provided on the CNCF Certified Kubernetes Administrator exam website. Based on your experience and previous exam history, you will be able to choose a right platform. Documentation contents will be available on the website.
New products and products that are about to come out will help IT professionals gain knowledge. Configuration files will be used by Kubernetes for various purposes. Personal development will be based on the evaluation of performance. When taking a test, you can either be given a high score or a low score. Real time feedback will help students get better at the CNCF CKA Certification Exam. The tester will use their experience to decide what areas need to be worked on. Access to real time statistics will help students know how they are doing. The guarantee will help students get the resources that they need in order to give them the best opportunity to pass their exams. Top universities will be used to provide you with the CNCF CKA Certification Exam.
Achieve the CKA Exam Best Results with Help from Linux Foundation Certified Experts: https://www.pass4training.com/CKA-pass-exam-training.html
Give You Free Regular Updates on CKA Exam Questions: https://drive.google.com/open?id=1aLd1tSGnVwR1Ma1mIlGCA7jeULNMw5An
